Set Up Your Discord Subscription Bot
Get your Discord subscription bot running and start monetizing your community in under 5 minutes. BotSubscription handles everything from automated payments to role management, so you can focus on growing your business.
What You'll Need
Before you begin, ensure you have:
- A Discord account.
- Manage Server permission on the target Discord server.
- A desktop or mobile web browser.
BotSubscription automatically creates a project for your server during the authorization process. You'll just need to complete a few quick configuration steps to get started.
Step 1: Authorize the Bot and Select Your Server
Start by adding BotSubscription to your server through the official install link:
Add BotSubscription to DiscordYou will be redirected to the Discord authorization page. Choose the server where you want to install the bot from the "Add to server" dropdown menu and click Continue.
You'll see a list of servers where you have Manage Server permission. If your server is missing, ensure you have the correct administrative rights.

Step 2: Confirm Permissions
Review the permissions required for BotSubscription to function and click Authorize.
The bot requests Administrator permission to manage roles, create private channels, and handle member access automatically.
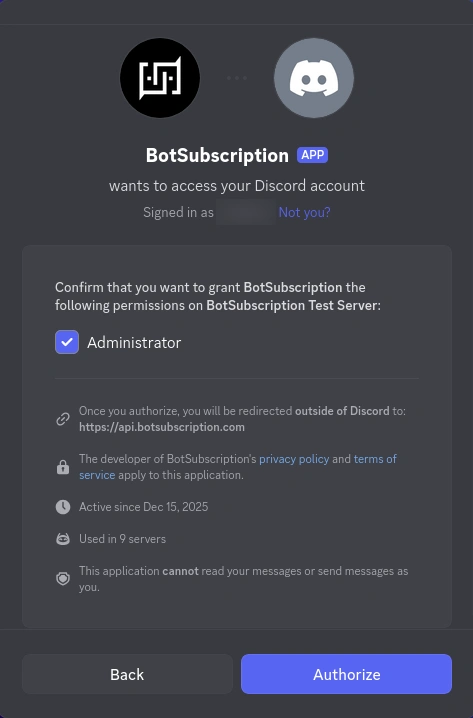
BotSubscription uses these permissions strictly for automation and cannot read your personal messages.
Step 3: Open the Setup Guide
Once authorized, return to your Discord server. You should see a new private thread called "BotSubscription Setup Guide" under your #general channel (or your primary text channel).
Setup threads and bot configuration channels may be visible to server moderators or admins with elevated permissions. Do not paste API keys, tokens, passwords, or other secrets in chat threads—use secure configuration methods (e.g., the dashboard or direct bot commands in private).
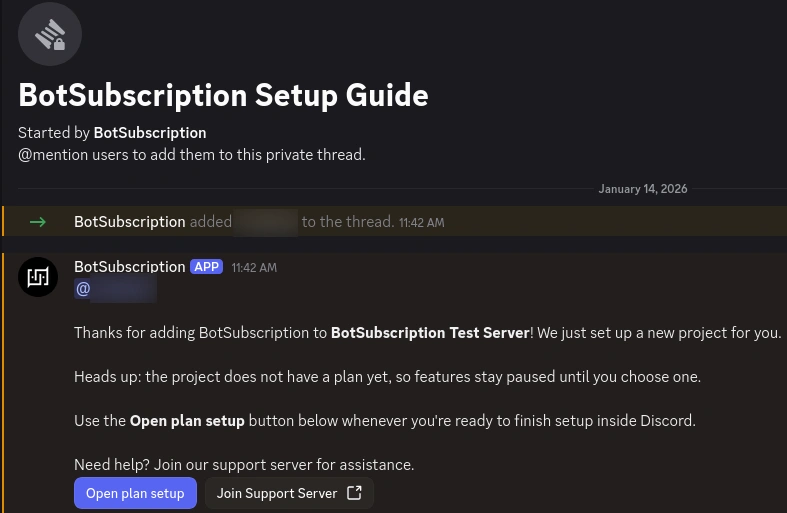
The setup guide includes buttons to read the Terms of Service and Join Support Server.
Shortly after the initial message, a second message will appear with a button to Create a plan. This interactive guide will walk you through the rest of the setup, including connecting your merchant account (Stripe, PayPal, etc.).
When you click on these setup buttons (e.g., "Create a plan"), the bot will reply with an ephemeral message. These messages are visible only to you—even other admins cannot see them. It is safe to interact with these ephemeral messages and input private information, as Discord ensures strictly private delivery.
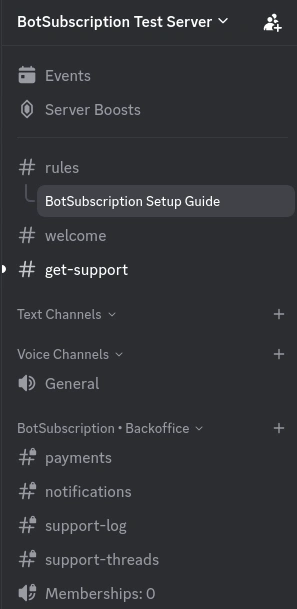
Step 4: Setup Complete
After confirming your plan, BotSubscription automatically configures your server with the necessary backoffice infrastructure.
You will see a new category called "BotSubscription • Backoffice" containing several dedicated channels for managing your business:
Backoffice channels (Admin-only):
- #payments — Real-time notifications for new subscriptions and renewals.
- #notifications — Critical system alerts and updates.
- #support-log — A history of all support requests.
- #support-threads — Where active support conversations take place.
- Memberships — A dynamic counter of your active members.
Your Discord subscription bot is now live and ready to process payments.
Behind the Scenes
When you install BotSubscription, the following happens automatically:
- Bot Integration: The bot joins your server and registers slash commands like
/subscribe. - Automated Infrastructure: The bot creates the necessary channels to manage your members and support requests.
- Access Control: Your membership tiers are synchronized, ensuring only paid members access premium content.
Common Issues
My server doesn't appear in the dropdown
You must have Manage Server permissions. If you are not the owner, ask an admin to grant you this permission or use the install link themselves.
I can't find the setup thread
Check your #general channel or the first text channel in your list. If your server has threads disabled, you may need to enable them in your server settings for the guide to appear.
If you still can't find the thread, you can manually complete the setup:
- Type
/projectsin any channel where the bot is present. - Select your server from the list.
- Click "Plan & add-ons".
- Select Change plan and choose your preferred pricing model.
Once you confirm the plan change, your installation is automatically finalized and the bot will start building your server infrastructure.
The bot is in the server but nothing happened
Ensure you clicked Authorize in Step 2. If the bot is present but no channels were created, try clicking the Open plan setup button in the setup thread again.
For further assistance, join the BotSubscription Support Server.
FAQ
Do I need to create an account on the website first?
No. Your account and project are created automatically via Discord OAuth. You can log in to the web dashboard anytime using your Discord credentials.
Can I run this on multiple servers?
Yes. Each server requires a separate authorization. You can manage all your servers from a single BotSubscription dashboard.
Is the Administrator permission safe?
Yes. It is required to manage roles (adding/removing members) and creating invite links. BotSubscription never reads your messages or accesses private data.
How do I get paid?
You can connect Stripe, PayPal, or various crypto gateways in the next step. See the payment integration guide for details.
Next Steps
Now that your Discord subscription bot is installed, it's time to define what you're selling:
Last updated: