Set Up a Custom Domain for Your Web Portal
A custom domain enhances your brand identity and ensures a smooth experience for your customers. This guide will walk you through the benefits of using a custom domain and provide a step-by-step tutorial on how to set it up.
Benefits of Using a Custom Domain
- Stronger Brand Identity – Your customers will see your domain instead of a generic link, reinforcing your brand.
- Smooth Bot Migration – Switching bots? Your URLs remain unchanged, preventing disruptions.
- Increased Trust & Credibility – A custom domain looks more professional and builds customer trust.
- Consistent Marketing – Keep your links unchanged across campaigns and platforms.
Important Notes
- Paid Add-On – Custom domains are a premium feature and require an additional fee, regardless of your plan.
- Domain Limit – Each bot can have one custom domain/path along with its default portal link.
- Domain Purchase – You must own a domain before proceeding. If you prefer not to buy one, you can use the free
subhere.netshared domain provided for all businesses. - DNS Configuration Required – You need access to your domain registrar’s DNS editor to make the necessary changes.
Step-by-Step Guide to Set Up a Custom Domain
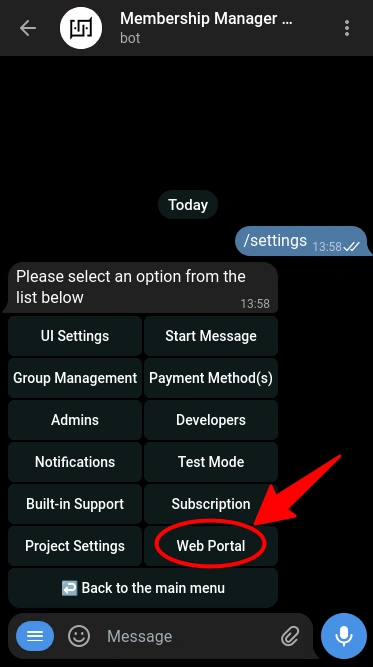
Step 1: Open Web Portal Settings in Your Bot
- Open Telegram and go to your bot.
- Type
/settingsand press Enter. - From the settings menu, select "Web Portal".
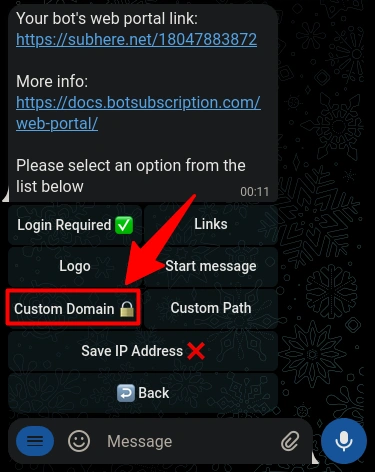
Step 2: Select ‘Custom Domain’ and Install the Add-on
- In the Web Portal menu, click Custom Domain.
- If the feature is locked, click the button to install the add-on.
- Follow the on-screen instructions to complete the installation.
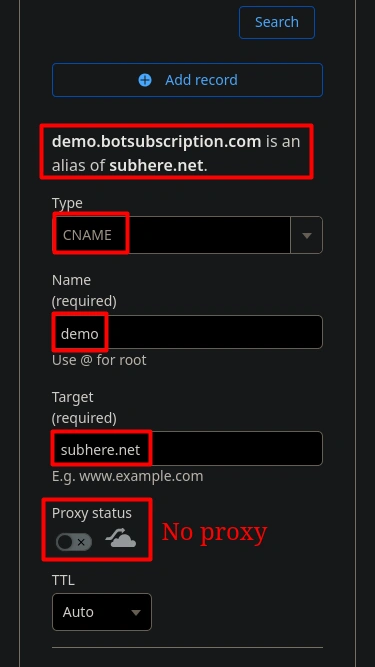
Step 3: Create a CNAME Record in Your DNS Control Panel
To link your domain, create a CNAME record pointing to subhere.net.
- Open your DNS editor (provided by your domain registrar).
- Add a CNAME record with the following details:
- Type: CNAME
- Name:
your-subdomain(e.g.,demo.botsubscription.comin our example). Some providers may require using @ for the root domain. - Target:
subhere.net
Important Notes:
- ✅ Use CNAME only – Do not use A, AAAA, MX, or TXT records.
- ✅ Disable Proxy (if using Cloudflare) – Ensure the CNAME points directly to
subhere.net. - ⏳ DNS Propagation Time:
- Most changes take effect within minutes.
- In rare cases, full propagation may take up to 48 hours.
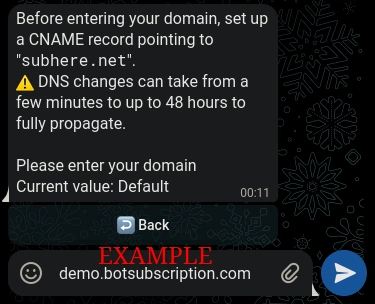
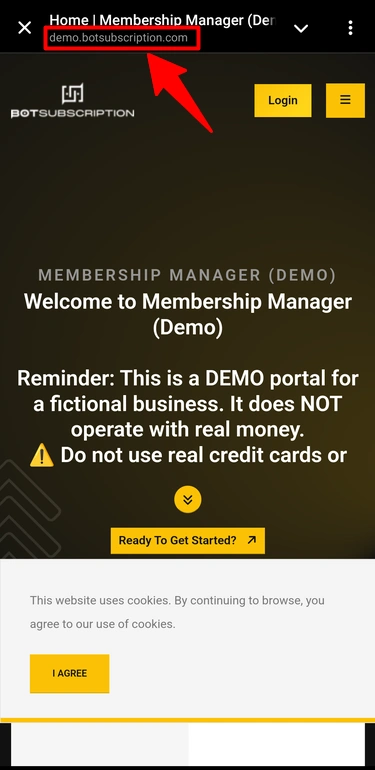
Step 4: Enter Your Domain
- Return to the Web Portal settings in your BotSubscription bot.
- Click Custom Domain and enter your domain without
http://orhttps://. - Example entry:
demo.botsubscription.com.
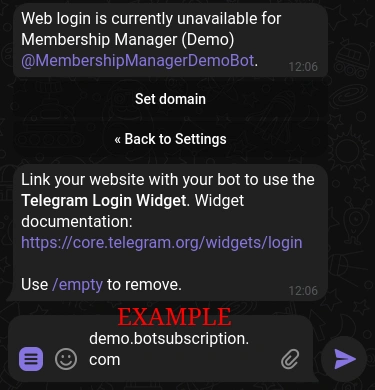
Step 5: Configure Your Domain in Telegram for Login Functionality
To ensure the Telegram login widget works seamlessly on your custom domain, you’ll need to configure your domain in Telegram’s Bot Settings. This step is crucial because Telegram allows only one domain per bot for security and functionality purposes. Here’s how to do it:
- Open @BotFather in Telegram.
- Access Your Bot’s Settings:
- Type /mybots and send it to @BotFather.
- Select the bot you’re configuring from the list.
- Navigate to Domain Settings:
- In the bot’s menu, select Bot Settings.
- Choose Domain from the options.
- Set Your Custom Domain:
- Select Set Domain.
- Enter the exact same domain you used for your web portal (e.g.,
demo.botsubscription.com).
Step 6: Verify & Finalize Your Setup
Once you save your domain:
- ✅ The system validates your DNS settings and checks if the CNAME is correctly configured.
- ✅ If everything is set up correctly, you’ll receive a success confirmation.
- ✅ Your domain should be functional within a few minutes (or up to 48 hours in rare cases).
Troubleshooting Common Issues
If your domain isn't working, check the following:
- 🔴 CNAME Record Not Found – Ensure your CNAME points to
subhere.net. - 🔴 Some providers may require entering the full domain (e.g.,
demo.botsubscription.com) instead of just the subdomain (e.g.,demo). - 🔴 Cloudflare Proxy Still Enabled – If you're using Cloudflare, ensure the proxy (orange cloud) is disabled so the CNAME is direct.
- 🔴 Propagation Delay – DNS changes can take time to update globally. You can check the status using a tool like DNSChecker.org.
- 🔴 Incorrect Domain Entry – Double-check your domain name for typos.
- 🔴 Clear Cache – Clear your browser cache or try accessing the web portal in incognito mode to rule out caching issues.
If the login widget isn’t working after completing the steps above, check the following:
- 🔴 Domain Mismatch – Ensure the domain entered in @BotFather matches exactly with the one used in your web portal settings.
Final Thoughts
🎉 Congratulations! Your BotSubscription web portal is now accessible through your own domain.
- 🔹 Stronger Branding – Customers see your domain instead of a generic link.
- 🔹 Seamless Bot Migration – Switching bots? No worries—you can keep the same URLs even if you switch bots.
- 🔹 More Professional Appearance – A custom domain enhances credibility and trust.
💡 Need help? If you experience issues, contact BotSubscription support for assistance.
Last updated: